Spring is almost here and that brings way more options to get you moving. Nicer weather means we can get outside and do all the amazing activities the outdoors offers. But we have been sitting for months now at home, so we don’t want to immediately jump into strenuous exercise as soon as we get outside. No one wants to start the new season with an injury! Sitting isn’t the best for our core muscles (the muscles that support our trunk and help with other movement) or back side, which are so important for stability and balance.
Instead, start with the simple exercises I’ve outlined below to avoid or get rid of back pain, to improve your posture, and get ready for all those fun outdoor activities without injury. These six exercises are perfect to do at home: you don’t need a ton of room or equipment for these ones. Sometimes simple and less time-consuming is best when motivation is harder to muster up when we’re limited to doing so much at home.
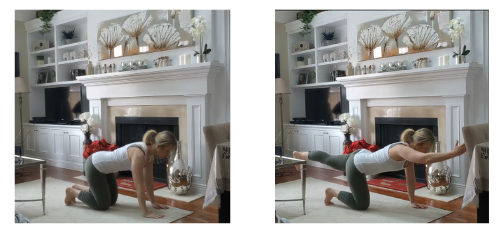
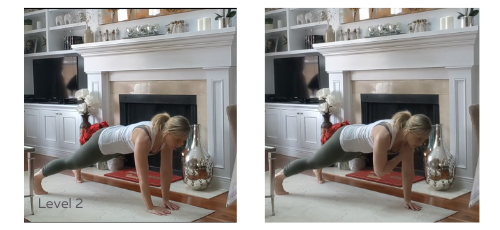
Bird-dog (10–20 repetitions):
This is a simple core exercise that helps improve stability and core strength. The bird-dog has quite a few benefits: it encourages a neutral spine, and improves rotary stability, shoulder stability and mobility, hip alignment, and overall body stabilization, which in turn helps reduce lower back pain.
- With a neutral spine, position yourself on the floor in a quadrupedal position (on hands and knees). Your knees should be directly under your hips and your hands directly under your shoulders.
- Raise your opposite arm and leg straight out with your thumb up; press back through your heel. Keep your abs braced, glutes tight and your body in a straight line from heel to fingers. Look at the floor, keeping your neck neutral as well.
- The goal is to avoid rotation: keep your hips squared and avoid overarching your spine in extension.
- Alternate sides for your desired number of repetitions.
Glute bridge (10–20 repetitions):
This exercise is great to start workouts with, right after your warm-up, as it creates better hip mobility. The glute bridges lock in stability, which improves your posture after sitting all day, and also help to improve how you execute other exercises. This exercise not only strengthens your glutes, but also targets your hamstrings and core.
- Lie on your back, with your knees bent and feet on a chair. Keep your arms at your side with your palms down.
- Make sure your legs are bent at 90 degrees.
- Start lifting your hips until your knees, hips, and shoulders form a straight line. Squeeze your glutes, keeping your abs pulled in so you avoid overextending your back. This also allows you to contract your glutes better.
- Come back to starting position, but hover slightly over the floor; complete your desired number of repetitions.

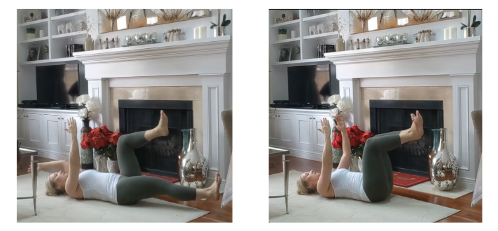
Dead bug (10–20 repetitions):
This exercise is great for promoting total core stability, as well as helping improve contra-lateral limb rhythm. This just means that dead bugs help to teach you to move more effectively with opposing limbs while keeping your core stable.
- Lie on your back with your arms extended straight up over your chest, but keep your shoulders down.
- Bend your knees at a 90-degree angle, lifting your feet off the ground. Your torso and thighs should be at a right angle; same for your thighs and shins. This is the starting position that looks like a dead bug.
- The key is to keep a neutral spine — meaning do not overarch your back. You are pulling breath in so your sides expand. You want to make sure your spine maintains this steady and neutral position throughout the exercise.
- Keep your right arm and left leg exactly where they are, locking them into place. Slowly extend your left arm backward, over your head and toward the floor, as you simultaneously extend your right knee and hip, reaching your right heel toward the floor.
- Keep your body from rotating and twisting. Everything should remain stable while your arm and leg move.
- Move slowly and steadily, exhaling as you go.
- Do the same movement on the opposite side; keep alternating for desired number of repetitions.
Alternating single leg deadlift (10–20 repetitions):
This exercise is great to strengthen your posterior kinetic chain (from your feet, up through your calves, hamstrings, glutes, and spine), and developing and improving balance and stability. This is a hip-hinge exercise and can be difficult to execute if you sit all day. I would start by using a step stool or box, as outlined below, so you master the correct form, then challenge yourself by removing the stool and adding weight.
- Stand straight with both feet on the ground and legs straight, hands hanging down in front of you. Have a step stool or box in front of you (this is great to start with to master the movement).
- With the supporting leg, grip the floor with your toes.
- Start by hinging at your hips while maintaining a neutral spine and pelvis (make sure your hips are tucked in as you move). Your arms remain hanging down.
- The opposite leg lifts up behind you; try to keep your hips square to avoid rotating the leg behind you. Your toes should point down towards the floor.
- When your hands lightly touch the stool or box, brace your core and slowly come up to standing.
- Plant that leg, gripping the floor with your toes and then extend the other leg back (as above).
- Keep alternating your legs until you complete the desired number of repetitions.

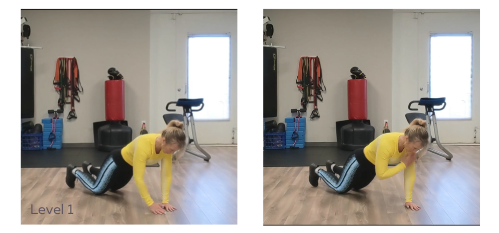
Plank shoulder taps (10–20 repetitions):
This plank variation is a great anti-rotation exercise that also helps with shoulder stability. It helps strengthen your transverse abdominus, which helps strengthen your core and improve stability — which, in turn, helps you avoid injury. You can work through progressively more difficult versions with this exercise as well.
- Start in a kneeling-plank position if you are new to planks. If you want to challenge yourself, then go into a tall plank, with your hands under your shoulders and on your toes. If you go from your knees to your toes, move your feet a bit wider apart for a greater base of stability. The closer your feet are together, the more challenging the exercise becomes.
- Place your hands close together so that your fingers are touching.
- You are trying to avoid rotation in your hips, so before you lift one hand, brace your stomach into your sides. Then lift one hand to touch the opposite shoulder.
- Take your time so you avoid rotation and keep your hips square.
- Place your hand back on the ground and do the same with the other arm. Keep alternating for the desired number of repetitions.
Remember to breathe! As you are about to move, take a deep breath in. As you start moving, exhale. Keep this breathing rhythm to help you execute the exercise with better form and control.
The number of repetitions you do will be based on where you are right now when it comes to movement. If you haven’t been moving much, start with fewer repetitions and work your way up weekly. You can start with doing each exercise once, then work your way up to two to three sets. Doing these exercises a couple of times per week will definitely improve your core strength and stability.
These exercises are also great to help with managing stress. They nurture the body, which is as necessary, if not more, as challenging the body. They complement any workout plan, but are also great if you are just starting out and trying to improve how you move before getting into more challenging exercises.
Part of physical wellness is improving how you move, in terms of stability, balance, mobility, and strength. In order to take on new activities or workouts, improving movement is essential to avoid injury, as well as helping you enjoy exercise — exercise, which should never be painful, is much more enjoyable when it feels right!